
Please contact the concert recording coordinator with any questions. You can reach out to James or Seungwoo for help with an efficient Pro Tools/Pyramix workflow.
Step #1: Sign up for a concert recording
- Each SR1 & SR2 records a minimum of 3 concerts per semester.
- You are required to attend the dress rehearsal.
- You cannot miss class to record a concert.
- Once you sign-up, you are committed. If you suddenly can’t make it, you need to find a replacement.
Step #2: Preparation
- You can find information for your concert as well as rehearsal on booking.music.mcgill.ca. If you would like to know more information, contact the production office who can put you in touch with the musicians.
- Regardless of the concert type or complexity you must plan for a set-up that allows you to create an excellent live stereo mix.
- Book the gear and halls, there is no priority access, so book early!
- Wear appropriate clothing (all back or dress clothes with indoor footwear).
Step #3: Before the Concert
Schedule
- You should be completely set-up before the dress rehearsal begins. The dress rehearsal is used for refining microphone position and setting your live mix.
- Interface with the stage managers and musicians during this time to determine priorities and resolve issues.
- Once the dress is done, you should arrive at least 1 hour before the concert beginning to double check your setup. This means all mics checked and live mix ready to go with basic settings BEFORE taking a break to run and get food etc. For webcasts, this includes checking the MC mic split if needed, also please ask if there will be an MC.
DAW Folder Structure and File Naming
Please do not include any accents or special characters in any file names destined for MLAPS. Unfortunately, it causes issues with the backup system.
- mcr[year][month][day][hall code][24hr time]_DescriptiveName
- The project name will always be provided by the webcasting team in the sign up spreadsheet
- (TRACKS folder) _[piece number][movement number]
- Folder Structure Example:
- mcr20191125p1930_SchulichInConcert_RobertLangevin
- mcr20191125p1930_SchulichInConcert_RobertLangevin_PMX
- mcr20191125p1930_SchulichInConcert_RobertLangevin.pmx
- Backup
- mcr20191125p1930_SchulichInConcert_RobertLangevin (Backup 2).pmx
- mcr20191125p1930_SchulichInConcert_RobertLangevin (Backup 3).pmx
- etc.
- Media Files
- MainL_FirstHalf.wav
- MainR_FirstHalf.wav
- MainL_SecondHalf.wav
- MainR_SecondHalf.wav
- etc.
- mcr20191125p1930_SchulichInConcert_RobertLangevin_TRACKS
- mcr20191125p1930_SchulichInConcert_RobertLangevin_0101.wav
- mcr20191125p1930_SchulichInConcert_RobertLangevin_0102.wav
- mcr20191125p1930_SchulichInConcert_RobertLangevin_0103.wav
- mcr20191125p1930_SchulichInConcert_RobertLangevin_0104.wav
- mcr20191125p1930_SchulichInConcert_RobertLangevin_0201.wav
- mcr20191125p1930_SchulichInConcert_RobertLangevin_0202.wav
- mcr20191125p1930_SchulichInConcert_RobertLangevin_VIDEO
- mcr20191125p1930_SchulichInConcert_RobertLangevin_FirstHalf.wav
- mcr20191125p1930_SchulichInConcert_RobertLangevin_SecondHalf.wav
- mcr20191125p1930_SchulichInConcert_RobertLangevin_LOG.xls
- mcr20191125p1930_SchulichInConcert_RobertLangevin_PROGRAM.pdf
- mcr20191125p1930_SchulichInConcert_RobertLangevin_PMX
- Concert Hall Codes
- b – Chapelle Historique du Bon Pasteur
- c – Clara Lichtenstein Hall
- j – Église Saint-Jean Baptiste
- s – Maison Symphonique
- n – Monument National
- m – MMR
- p – Pollack
- r – Redpath
- t – Tanna
- x – Théâtre Paradoxe
- w – Wirth Opera Studio
DAW Settings & Recording
- 96kHz, 24bit, BWF, one file per track
- Pyramix requires specific settings in Settings > All Settings > Project > Record
- “BWF”
- “Suffix with strip name”
- “One file per track”
- Pyramix requires specific settings in Settings > All Settings > Project > Record
- Check your disk space.
- Test record during the dress rehearsal and 15min before the concert start.
- An excellent live stereo mix is required for delivery and webcasting.
- Always run a backup recorder.
- During webcasts, the webcasting team will tell you when to start and stop recording.
- If you doing a video webcast, please see the timecode appendix below.
Step #4: After the Concert
Complete all post-production and file transfers immediately after the concert.
Editing & Mastering
- Edit out pauses, tuning, and excessive noise before, after, and between pieces.
- Leave about 10 seconds of applause with a long fade.
- Only fade to black between pieces, not between movements.
- Some announcements/jokes/anecdotes add to the live experience and are worth
keeping, others are better left out. Your call. - There should be 1-2 seconds of noise floor before music at each track beginning.
- The use of a master limiter and the final LUFS of the master is at your discretion but should meet industry standards for the genre.
- Exceptionfor concerts with video webcast: Prepare the version described above in addition to a special video version: fully continuous without edits (except for when the recorder was stopped). Bounce from the beginning of when you hit record until the recorder was stopped.
- Please note: when recording with timecode sync to the video team, you must use the Pyramix “Mixdown” function in order to preserve the timecode relation in the exported WAV files. Generate CD/Digital Delivery resets the timecode references.
Deliverables (the type of deliverable is indicated on the sign-up sheet)
- MLAPS
- 96kHz/24bit stereo interleaved BWF files for each track/movement listed in the concert program.
- Recording log with an entry for each track. Click here to download the current concert recording log. here is a filled example.
- PDF of the program (download from the Production Office website)
- Upload the deliverables + DAW session folder to MLAPS using the folder structure and naming outlined above.
- MLAPS + Video Webcast
- The same deliverables as “MLAPS” + the separate video edit in the appropriately named folder.
- This form dispatches an elf that does all of the work for you.
(Timecode Appendix)
For concert recordings which are being webcast, you will need to run timecode in your session. We are receiving timecode from the video team in the DAW.
Step 1: Choosing the TC Framerate
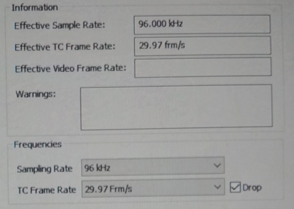
Under Settings > Formats & Sync, choose 29.97 Frm/s and check the Drop checkbox. We always run 29.97 drop-frame. This needs to be set every time Pyramix is closed and reopened (even if you’re reopening a saved session).
Step 2: Checking the LTC input
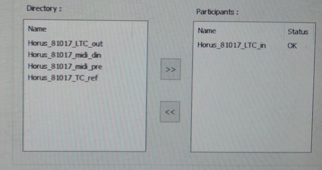
Under Settings > Midi Sync, make sure the Horus_LTC_in has the OK Status. If it reads NOK, you can remove it and add it back until it reads OK.
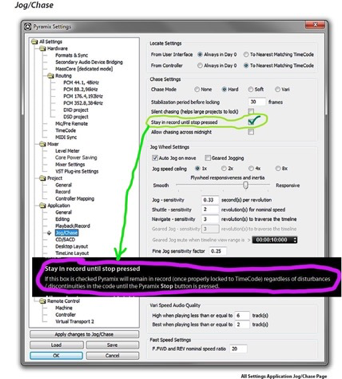
Step 3: Making sure timecode discontinuities can’t stop the recording (courtesy of Jerry)
Step 4: Lock in Timecode
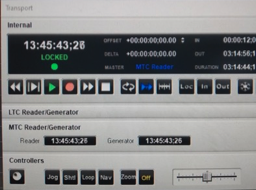
Open the Transport window and press the blue arrows. After a few seconds, timecode should read LOCKED.
Note: When you lock timecode, you may not be able to monitor your inputs. This is because incoming timecode has made Pyramix go into playback until you hit record. Change your tracks to “input monitor” (the circle, not the circle + play sign) so that you continue to receive live inputs in playback and record.